
Nginx
yum 安装
vim /etc/yum.repos.d/nginx.repo
[nginx-stable]
name=nginx stable repo
baseurl=http://nginx.org/packages/centos/$releasever/$basearch/
gpgcheck=1
enabled=1
gpgkey=https://nginx.org/keys/nginx_signing.key
module_hotfixes=true

[nginx-mainline]
name=nginx mainline repo
baseurl=http://nginx.org/packages/mainline/centos/$releasever/$basearch/
gpgcheck=1
enabled=0
gpgkey=https://nginx.org/keys/nginx_signing.key
module_hotfixes=true

dnf install nginx -y
systemctl start nginx
systemctl enable nginx
源码安装
系统,基础依赖
- CentOS 7.x
yum install -y epel-release yum-utils
yum install -y vim net-tools numactl lrzsz zip unzip wget htop git telnet
yum install -y gcc automake autoconf libtool make
yum install -y pcre-devel openssl openssl-devel
安装 LuaJIT
若不需要 lua 支持,可忽略此过程
wget http://luajit.org/download/LuaJIT-2.0.5.tar.gz
tar -zxvf  LuaJIT-2.0.5.tar.gz
cd LuaJIT-2.0.5
make install PREFIX=/usr/local/luajit

# /etc/profile 文件中加入环境变量
vim /etc/profile.d/LuaJIT.sh
export LUAJIT_LIB=/usr/local/luajit/lib
export LUAJIT_INC=/usr/local/luajit/include/luajit-2.0

source /etc/profile
lua 环境处理
若不需要 lua 支持,可忽略此过程
# vim /etc/ld.so.conf.d/lua.conf
/usr/local/luajit/lib
# ldconfig
ngx_devel_kit 和 lua-nginx-module
若不需要 lua 支持,可忽略此过程
cd /opt/download

wget https://github.com/simpl/ngx_devel_kit/archive/v0.3.1.tar.gz
mv v0.3.1.tar.gz ngx_devel_kit-0.3.1.tar.gz
tar -zxvf ngx_devel_kit-0.3.1.tar.gz

wget https://github.com/openresty/lua-nginx-module/archive/v0.10.9rc7.tar.gz
mv v0.10.9rc7.tar.gz lua-nginx-module-0.10.9rc7.tar.gz
tar -zxvf lua-nginx-module-0.10.9rc7.tar.gz
这里有一个大坑, lua-nginx-module-v0.10.17.tar.gz 安装会报错。更换 0.10.9rc7 后解决
源码安装 nginx
mkdir /opt/download
cd /opt/download
wget http://nginx.org/download/nginx-1.18.0.tar.gz
tar -zxvf nginx-1.18.0.tar.gz
cd /opt/download/nginx-1.18.0

./configure --prefix=/opt/nginx \
--sbin-path=/opt/nginx/sbin/nginx \
--modules-path=/opt/nginx/modules \
--conf-path=/opt/nginx/config/nginx.conf \
--error-log-path=/opt/nginx/log/error.log \
--http-log-path=/opt/nginx/log/access.log \
--pid-path=/opt/nginx/log/nginx.pid \
--lock-path=/opt/nginx/log/nginx.lock \
--http-client-body-temp-path=/opt/nginx/cache/client_temp \
--http-proxy-temp-path=/opt/nginx/cache/proxy_temp \
--http-fastcgi-temp-path=/opt/nginx/cache/fastcgi_temp \
--http-uwsgi-temp-path=/opt/nginx/cache/uwsgi_temp \
--http-scgi-temp-path=/opt/nginx/cache/scgi_temp \
--user=nginx \
--group=nginx \
--with-compat \
--with-file-aio \
--with-threads \
--with-http_addition_module \
--with-http_auth_request_module \
--with-http_dav_module \
--with-http_flv_module \
--with-http_gunzip_module \
--with-http_gzip_static_module \
--with-http_mp4_module \
--with-http_random_index_module \
--with-http_realip_module \
--with-http_secure_link_module \
--with-http_slice_module \
--with-http_ssl_module \
--with-http_stub_status_module \
--with-http_sub_module \
--with-http_v2_module \
--with-mail \
--with-mail_ssl_module \
--with-stream \
--with-stream_realip_module \
--with-stream_ssl_module \
--with-stream_ssl_preread_module \
--with-cc-opt='-O2 -g -pipe -Wall -Wp,-D_FORTIFY_SOURCE=2 -fexceptions -fstack-protector-strong --param=ssp-buffer-size=4 -grecord-gcc-switches -m64 -mtune=generic -fPIC' \
--with-ld-opt='-Wl,-z,relro -Wl,-z,now -pie -Wl,-rpath,/usr/local/include/lib' \
--add-module=/opt/download/ngx_devel_kit-0.3.1 \
--add-module=/opt/download/lua-nginx-module-0.10.9rc7

# 若不需要 lua 支持,请移除最后两个 module

make && make install

mkdir /opt/nginx/cache # 这个傻x 居然不会自己创建 cache 目录

# 权限
chown -R apps:apps /opt/nginx/
chown root:apps /opt/nginx/sbin/nginx
chmod u+s /opt/nginx/sbin/nginx
操作
cd /opt/nginx/sbin
启动: ./nginx
重载: ./nginx -s reload
测试
server {
    listen       80;
    server_name lua.test.wkclz.com;

    location /lua {
        set $test "hello,world";
        content_by_lua '
        ngx.header.content_type="text/plain"
        ngx.say(ngx.var.test)';
    }
}
其他处理
# 查看动态连接库
 ldd $(which /otp/nginx/sbin/nginx)
nginx 自动部署
为方便完成 nginx 的自动部署,需要配置规范化,并放置脚本到 git 仓库中,下属服务器后自动化部署。具体规范过一次sh 脚本即可
跟随nginx的脚本【nginx 操作】:
#!/bin/sh

# 参数
DIST_PATH=/opt/nginx/config # nginx 配置目录
TEMP_PATH=/opt/deploy_temp # 临时目录,与git 仓库拉取的一致
REPO_NAME=nginx_config  # git 仓库的名称
SERVER=服务器名称,与git上的目录对应,便于发布

echo "部署中..."

rm -rf $DIST_PATH/conf.d
rm -rf $DIST_PATH/nginx.conf

cp -r $TEMP_PATH/$REPO_NAME/$SERVER/conf.d $DIST_PATH
cp -r $TEMP_PATH/$REPO_NAME/$SERVER/nginx.conf $DIST_PATH

# 启动
echo "重启应用..."
cd $DIST_PATH
cd ../sbin
./nginx -s reload

exit
跟随服务器的脚本【服务器内nginx 配置下发操作】:
#!/bin/sh

# 参数
GIT_REPO=https://gitee.com/work_group/nginx_config.git
REPO_NAME=nginx_config  # git 仓库的名称
export SERVER=服务器名称,与git上的目录对应,便于发布

echo "开始..."


# 临时目录
export TEMP_PATH=/opt/deploy_temp
mkdir -p $TEMP_PATH
cd $TEMP_PATH
echo "已创建临时目录 $TEMP_PATH"


# 代码
echo "准备拉取代码,可能需要验证信息..."
git clone $GIT_REPO

# 部署
echo "准备发布..."

echo "切换 nginx 权限用户 root: "

su - root -c 'sh $TEMP_PATH/$REPO_NAME/$SERVER/deploy.sh'

# 清理遗留
rm -rf $TEMP_PATH
echo "=====================> 完成!"

cd ~
Docker 安装
Dockerfile
FROM nginx
MAINTAINER shrimp
WORKDIR /home/apps

# 时区
ENV TZ=Asia/Shanghai
RUN ln -snf /usr/share/zoneinfo/${TZ} /etc/localtime && echo ${TZ} > /etc/timezone

# 配置
COPY nginx.conf /etc/nginx/nginx.conf
# 编译产物
COPY dist /home/apps

# 日志挂载
RUN mkdir /home/apps/logs && ln -sf /home/apps/logs /var/log/nginx

# 启动命令【注意需要前台启动】
CMD ["nginx", "-g", "daemon off;"]
项目打包
- 项目根目录需要维护 nginx.conf
- nginx location 的静态文件,需要指向 /home/apps
Nginx 常用配置
配置
- 配置要求前后端分离
- 域名分离
- 后端接口做跨域支持
- 此处提供多个配置 demo,需要组合使用
全局配置
user apps apps;

#error_log  logs/error.log;
#error_log  logs/error.log  notice;
#error_log  logs/error.log  info;
#pid        logs/nginx.pid;

worker_processes        auto; #工作进程数,auto即为cpu核心数
worker_rlimit_nofile    65535; #每个 worker 可用的句柄数【注意系统支持的最大值】
worker_cpu_affinity     01 10; #【需要与CPU配置】强制 CPU 亲和性,降低多核CPU切换带来的性能损耗

events {
    use                 epoll; # select/poll/epoll/kqueue, linux内核在2.6以上,就是为了能使用epoll函数来优化Nginx
    worker_connections  1024; # 用来配置单个worker进程最大的连接数,nginx 默认连接数是1024,`cat /proc/sys/fs/file-max` 获取系统最大句柄数
    multi_accept        on; # 用来设置是否允许同时接收多个网络连接
    accept_mutex        on; # "惊群"问题
}


http {
    include         mime.types;
    charset         UTF-8;

    log_format main '{"@timestamp":"$time_iso8601",'
                    '"http_trace_id":"$http_trace_id",' # 需要结合前端的 trace-id 使用
                    '"http_x_forwarded_for":"$http_x_forwarded_for",'
                    '"server_addr":"$server_addr",'
                    '"remote_user":"$remote_user",' # 需要结合 ldap 模块才能获取到
                    '"remote_addr":"$remote_addr",'
                    '"bytes_sent":"$bytes_sent",'
                    '"body_bytes_sent":"$body_bytes_sent",'
                    '"request_length":"$request_length",'
                    '"request_time":"$request_time",'
                    '"request_method":"$request_method",'
                    '"server_protocol":"$server_protocol",'
                    '"scheme_host_request_uri":"$scheme://$host$request_uri",'
                    '"status":"$status",'
                    '"upstream_addr":"$upstream_addr",'
                    '"upstream_status":"$upstream_status",'
                    '"upstream_response_time":"$upstream_response_time",'
                    '"http_referer":"$http_referer",'
                    '"http_user_agent":"$http_user_agent"'
                    '}';

    access_log logs/access.log main;

    default_type    application/octet-stream;

    client_body_buffer_size     1024m; # 读取客户端请求体时的缓冲区
    client_max_body_size        0;  # 允许的客户端最大请求体大小, 0为不限制。Content-Length 超过此值将收到 413

    keepalive_disable           none; # 对某些浏览器不再使用keepalive,默认 msie6
    keepalive_requests          10000; # 一个TCP连接上最多执行多少个HTTP请求
    keepalive_timeout           65; # HTTP请求连接完成以后,最多经过timeout时间,如果还是没有新的请求,就会关闭连接,默认 75秒
    server_tokens               off; # 隐藏 nginx 版本号
    underscores_in_headers      on; # off 表示当客户端请求头中带有下划线的字段默认将会被标识为无效字段。

    sendfile                    on; # sendfile是 Linux2.0+以后的推出的一个系统调用,不但能减少切换次数而且还能减少拷贝次数。
    tcp_nodelay                 on; # 关闭Nagle算法(启用不延时)
    tcp_nopush                  on; # 与 tcp_nodelay 互斥。Nagle 需要等待0.2s, 此处只需要等待数据包大小到达一定值即可推送。依赖 sendfile

    server {
        server_name localhost;
        # 使用了 reuse_port 特性以后,多个 worker 进程可以分别用自己不同的 socket 去监听,避免对同一个 socket 进行 accept 时的锁的开销
        # 参数backlog 限制了用于存放处于挂起状态连接的队列最大长度. 默认-1。太大会导致"Broken pipe",太小会导致"502 Bad Gateway",建议值:backlog=QPS
        listen 80 reuseport backlog=10240;

        access_log logs/localhost.access.log  main; # 按 server 配置日志

        # 这个时间不够,代码写得太烂了。。
        proxy_connect_timeout       60s;
        proxy_read_timeout          60s;
        proxy_send_timeout          60s;

        location / {
            # 默认1.0, 不支持文件分块传递。1.1 之后才支持keepalive
            proxy_http_version      1.1;
            proxy_buffering          on;
            proxy_request_buffering  on;

            # 常用 http 头
            proxy_set_header        Host               $host;
            proxy_set_header        X-Real-IP          $remote_addr;
            proxy_set_header        X-Forwarded-For    $http_x_forwarded_for;

            # websocket 支持必需
            proxy_set_header        Upgrade            $http_upgrade;
            proxy_set_header        Connection         "upgrade";

            # 当传输大文件时,建议优化此参数
            proxy_buffering             on;
            proxy_buffer_size           64k;
            proxy_buffers               4 128k;
            proxy_busy_buffers_size     256k;
            proxy_max_temp_file_size    0;

            # localhost表示本机的名字,127.0.0.1是经过系统的映射的本机IP。所以实际来说大部分情况建议直接使用localhost
            proxy_pass              http://localhost:8088;
        }
    }
    # 将多 server 拆解,方便维护
    include conf.d/*.conf;
}
gzip压缩
# 开启 gzip 压缩
gzip                on;
gzip_vary           on;
gzip_types          text/plain application/javascript application/x-javascript text/javascript text/xml text/css;
gzip_disable        "MSIE [1-6]\."; #请求头中的 UserAgent 字段满足此正则时不启用压缩
gzip_buffers        4 16k;
gzip_min_length     1k;
gzip_comp_level     6; # gzip的压缩率,1-9,数字越大,压缩率越高,占用cpu也越高
gzip_http_version   1.1; # 部分早期的 HTTP/1.0 客户端在处理 GZip 时有 Bug
可独立成 gzip.conf 再 include 到 nginx.conf 内
纯静态文件
server {
    listen       80;
    server_name  static.wkclz.com;
    location / {
        root   /opt/dist/static;
        index  index.html;
    }
}
读取文件列表
server {
    listen       80;
    server_name  static.wkclz.com;
    location / {
        autoindex on;
        autoindex_exact_size on;
        autoindex_localtime on;
        root /opt/dist/static;
    }
}
纯反向代理配置
server {
    listen       80;
    server_name eureka.wkclz.com;
    location / {
        proxy_set_header Host $host;
        proxy_set_header Cookie $http_cookie;
        proxy_set_header X-Real-IP $remote_addr;
        proxy_set_header X-Forwarded-For $proxy_add_x_forwarded_for;
        proxy_pass http://127.0.0.1:8001;
        break;
    }
}
纯301跳转配置
server {
    listen       80;
    server_name  www.wkclz.com api.wkclz.com;
    if ($scheme = http ) {
        return 301 https://$host$request_uri;
    }
}
重写实现 301
server {
    listen       80;
    server_name jenkins.wkclz.com;
    location / {
        rewrite ^/(.*)$ http://127.0.0.1:9012/$1 permanent;
    }
}
单页面应用配置
server {
    listen       80;
    server_name  mobile.wkclz.com;
    location / {
        root   /opt/dist/mobile;
        index  index.html;
        try_files $uri $uri/ /index.html;
    }
    location ~* .(js|css|jpg|png|mp3|html|htm|jpeg|ttf|woff|ico|woff2|map)$ {
        alias /opt/dist/mobile/$uri;
    }
}
SSL 配置
server {
    listen       443 ssl;
    server_name  api.wkclz.com;

    underscores_in_headers on;

    ssl_certificate      conf.d/ssl/api.wkclz.com.pem;
    ssl_certificate_key  conf.d/ssl/api.wkclz.com.key;

    ssl_session_timeout 5m;
    ssl_ciphers ECDHE-RSA-AES128-GCM-SHA256:ECDHE:ECDH:AES:HIGH:!NULL:!aNULL:!MD5:!ADH:!RC4;
    ssl_protocols TLSv1.1 TLSv1.2 TLSv1.3;
    ssl_prefer_server_ciphers on;

    location / {
        # proxy
        proxy_set_header Host $host;
        proxy_set_header Cookie $http_cookie;
        proxy_set_header X-Real-IP $remote_addr;
        proxy_set_header X-Forwarded-For $proxy_add_x_forwarded_for;
        proxy_pass http://127.0.0.1:8080;
        break;
    }
}
跨域配置
server {
    listen       80;
    server_name  api.wkclz.com;

    location / {
        # options request
        if ( $request_method = 'OPTIONS') {
            add_header Access-Control-Allow-Origin "$http_origin";
            add_header Access-Control-Allow-Credentials "true";
            add_header Access-Control-Allow-Methods "GET, POST, OPTIONS";
            add_header Access-Control-Allow-Headers "Content-Type,token";
            add_header Access-Control-Max-Age 1728000;
            return 204;
        }
        # other request
        add_header Access-Control-Allow-Origin "$http_origin" always;

        # proxy
        proxy_set_header Host $host;
        proxy_set_header Cookie $http_cookie;
        proxy_set_header X-Real-IP $remote_addr;
        proxy_set_header X-Forwarded-For $proxy_add_x_forwarded_for;
        proxy_pass http://127.0.0.1:8080;
        break;
    }
}
nginx 域名验证
server {
    listen       80;
    server_name  api.example.com;
    location ^~ /.well-known/pki-validation/fileauth.txt {
        add_header Content-Type 'text/html; charset=utf-8';
        return 200 'xxxxxxxxxx';
    }
}
nginx 微信服务器校验
server {
    listen       80;
    server_name  api.example.com;
    location /MP_verify_xxxxxxxxxx.txt {
        add_header Content-Type 'text/html; charset=utf-8';
        return 200 'xxxxxxxxxx';
    }
}
开启 base 认证
server {
    listen       80;
    server_name admin.wkclz.com;

    auth_basic "User Authentication";
    auth_basic_user_file conf.d/pass.db;

    location / {
        proxy_set_header Host $host;
        proxy_set_header Cookie $http_cookie;
        proxy_set_header X-Real-IP $remote_addr;
        proxy_set_header X-Forwarded-For $proxy_add_x_forwarded_for;
        proxy_pass http://127.0.0.1:8031;
        break;
    }
}

# pass.db
admin:xxxxxxxxx
拦截指定请求
location ~* .\.(php|rar|gz|bak|7z|py|cgi|pl|sh|git|aspx|env)$ {
    return 403;
}
if ($request_uri = / ) {
    return 403;
}
TCP转发
# 在 http 之外配置
stream {
    server {
        listen 8888;
        proxy_pass 127.0.0.1:8889;
    }
}
stream {
    server {
        listen 8809;
        proxy_pass proxy_2_8809;
    }
}
upstream proxy_2_8809 {
    server 127.0.0.1:8811;
    server 127.0.0.1:8812;
}
UDP转发
# 在 http 之外配置
stream {
    server {
        listen 8888 udp;
        proxy_pass 127.0.0.1:8889;
    }
}
安全配置
| 注解标签 | 注解值 | 可选值 | 说明 |
|---|---|---|---|
| X-Frame-Options | SAMEORIGIN | DENY/SAMEORIGIN/ALLOW-FROM uri | 浏览器指示允许一个页面可否在 <frame>, </iframe> 或者 <object> 中展现的标记 |
| X-XSS-Protection | 1; mode=block | 0/1/1; mode=block | 检测到跨站脚本攻击 (XSS)时,浏览器将停止加载页面 |
| X-Content-Type-Options | nosniff | nosniff | Content-Type是错的或者未定义时,可以禁用浏览器的类型猜测 |
| Content-Security-Policy | default-src 'self' | 可选值有点多,需要再查询 | 定义一套页面资源加载白名单规则,浏览器使用csp规则去匹配所有资源,禁止加载不符合规则的资源,同时将非法资源请求进行上报。 |
配置示例
add_header X-Frame-Options "SAMEORIGIN" always;
add_header X-XSS-Protection "1; mode=block" always;
add_header X-Content-Type-Options "nosniff" always;
add_header Content-Security-Policy "default-src 'self'" always;
其他知识
try_files
Checks the existence of files in the specified order and uses the first found file for request processing; the processing is performed in the current context. The path to a file is constructed from the fileparameter according to the root and alias directives. It is possible to check directory’s existence by specifying a slash at the end of a name, e.g. “$uri/”. If none of the files were found, an internal redirect to the uri specified in the last parameter is made.
翻译:
- 按指定的file顺序查找存在的文件,并使用第一个找到的文件进行请求处理,处理过程仅在当前上下文有效。
- 查找路径是按照给定的root或alias为根路径来查找的
- 如果给出的file都没有匹配到,则重新请求最后一个参数给定的uri,就是新的location匹配
使用:
- 在 vue 或 react 内,若 router 使用了 hash 模式,最好配置 try_files 来确保请求能找到处理文件。同时内部要自行解决路由匹配的404问题
- 若服务没法使用 try_files, 则必需配置默认页面,并且需要引导用户,不能访问到其他 uri
location
| 匹配符 | 含义 | 配置示例 | 匹配示例 |
|---|---|---|---|
| 不加任何规则,默认是大小写敏感,前缀匹配 | location /abc/ | http://abc.com/abc/ | |
| = | 精确匹配 | location = /abc/ | http://abc.com/abc/ |
| ~ | 执行正则匹配,区分大小写 | location ~ /Abc/ | http://abc.com/Abc/xxx |
| ~* | 执行正则匹配,忽略大小写 | location ~ /Abc/ | http://abc.com/abc/xxx |
| ^~ | 普通字符串匹配上以后不再进行正则匹配 | location ^~ /abc/ | http://abc.com/abc/xxx |
匹配顺序:
=>^~>~ | ~*>最长前缀匹配>/
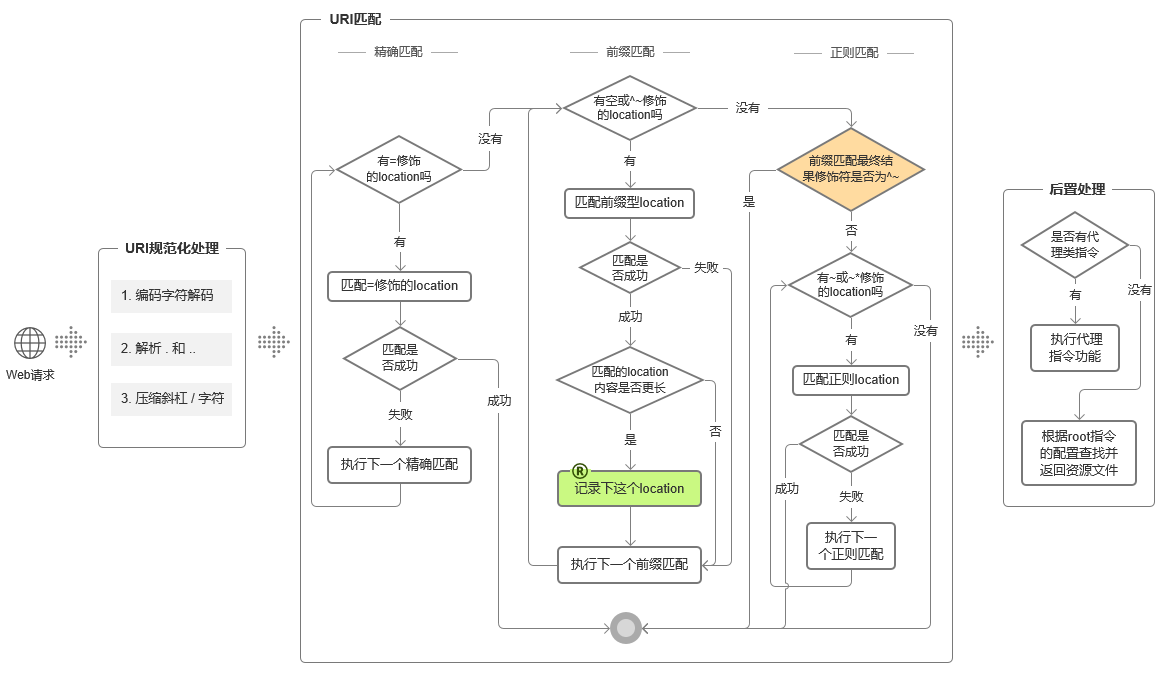
location指令的处理流程,总体上分类三个阶段,分别是:uri规范化处理、uri匹配、后置处理
- uri规范化处理
- 解码 &xx 这样的url编码字符
- 解析
./或../路径,变成标准路径 - 多个
/压缩成一个/
- uri匹配
- 精确匹配
- 缀匹配,若命中多个,匹配最长的一个
- 正则匹配(匹配成功即停止匹配)
- 后置处理
- 处理 {} 内的内容
proxy_pass
proxy_pass命令会将请求代理到一个新的uri地址,这个新的代理地址,与proxy_passs配置的最后一个字符是否为斜杠 / 没有关系,只与proxy_pass的配置是否带有uri(这里的uri是指url中,端口之后与问号之前的部分)相关,具体如下:
不带uri时(如
http://localhost:8379)- 新的地址构成为:proxy_pass的配置内容 + 原始请求URI中去除掉协议、主机和端口后的剩余内容
配置了uri时(如:
http://localhost:8379/或http://localhost:8379/foo)- 新的地址构成为:proxy_pass的配置内容 + 原始请求uri中去除掉协议、主机、端口和location配置内容后的剩余部分
从上面可以看出,proxy_pass在创建新的转发地址时,总是会剔除掉原始uri中的协议、主机、端口。核心差异在于是否要去除掉location指令的配置内容。如果proxy_pass配置带有uri就去除,反之则不去除。
另外,像http://localhost:8379/ 这个地址很特别,因为去除掉协议、主机、端口后,就只剩下 / 了,这大概就是,以斜杠结尾的配置会去除location配置内容这个错误说法的源头了。事实上,像http://localhost:8379/foo这个地址,uri为/foo,它并没有以 / 结尾,但在生成新的转发uri时,同样会去除掉location的配置内容。
root&alias
- [root]
- 语法:root path
- 默认值:root html
- 配置段:http、server、location、if
- root会根据完整的URI请求来映射,也就是/path/uri
- [alias]
- 语法:alias path
- 配置段:location
- alias会把location后面配置的路径丢弃掉,把当前匹配到的目录指向到指定的目录
使用注意:
- 使用alias时,目录名后面一定要加"/"。
- alias可以指定任何名称。
- alias在使用正则匹配时,必须捕捉要匹配的内容并在指定的内容处使用。
- alias只能位于location块中。